
484 字
2 分鐘
[範例] popupForm 進行數位簽章 | 自然人憑證開發筆記
前面已經花了六篇來介紹數位簽章,終於可以開始進入數位簽章的範例,本篇將說明如何透過 JavaScript 進行數位簽章。
範例程式
以下範例同時支援 PKCS1、PKCS7、RAW。輸入完相關資訊,會回傳卡號、憑證、簽章值。
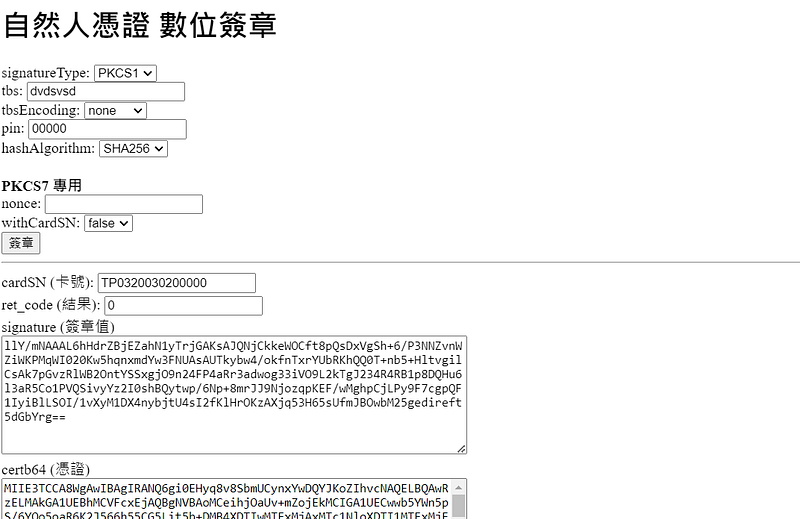
<h1>自然人憑證 數位簽章</h1>signatureType: <select id="signatureType"> <option value="PKCS1" selected>PKCS1</option> <option value="PKCS7">PKCS7</option> <option value="RAW">RAW</option></select><br>tbs: <input type="text" id="tbs" /><br>tbsEncoding: <select id="tbsEncoding"> <option value="none" selected>none</option> <option value="base64">base64</option></select><br>pin: <input type="text" id="pin" /><br>hashAlgorithm: <select id="hashAlgorithm"> <option value="SHA1">SHA1</option> <option value="SHA256" selected>SHA256</option> <option value="SHA384">SHA384</option> <option value="SHA512">SHA512</option></select><br><br><b>PKCS7 專用</b><br>nonce: <input type="text" id="nonce" /><br>withCardSN: <select id="withCardSN"> <option value="false" selected>false</option> <option value="true">true</option></select><br><input type="button" value="簽章" onclick="submit()"><br><hr>cardSN (卡號): <input type="text" id="cardSN" /><br>ret_code (結果): <input type="text" id="ret_code" /><br>signature (簽章值)<br><textarea id="signature" rows="8" cols="65"></textarea><br>certb64 (憑證)<br><textarea id="certb64" rows="8" cols="65"></textarea><br>last_error: <input type="text" id="last_error" /><br>message (錯誤訊息): <input type="text" id="message" /><br>message2 (錯誤訊息): <input type="text" id="message2" /><br>
<script> let popupForm; let timeout;
function submit() { popupForm = window.open( "http://localhost:61161/popupForm", "popupForm", "height=200, width=200, left=100, top=20" ); timeout = setTimeout(() => { popupForm.close(); alert("尚未安裝元件"); }, 5000); }
function receiveMessage(event) { if (event.origin !== "http://localhost:61161") return;
let ret = JSON.parse(event.data); if (ret.func === "getTbs") { // 進行數位簽章 clearTimeout(timeout); const tbsData = { func: "MakeSignature", signatureType: document.getElementById("signatureType").value, tbs: document.getElementById("tbs").value, tbsEncoding: document.getElementById("tbs").value, pin: document.getElementById("pin").value, hashAlgorithm: document.getElementById("hashAlgorithm").value, nonce: document.getElementById("nonce").value, withCardSN: document.getElementById("withCardSN").value }; popupForm.postMessage(JSON.stringify(tbsData), "*"); } else { // 將簽章結果寫入欄位 const result = JSON.parse(event.data); document.getElementById("cardSN").value = ret.cardSN; document.getElementById("ret_code").value = ret.ret_code; document.getElementById("signature").value = ret.signature; document.getElementById("certb64").value = ret.certb64; document.getElementById("last_error").value = ret.last_error; document.getElementById("message").value = ret.message; document.getElementById("message2").value = ret.message2; } }
window.addEventListener("message", receiveMessage, false);</script>程式碼說明
請先參考本篇關於網頁存取 HiPKI Local Server 的說明,程式碼差不多。主要差別在送出的資料內容。Request 與 Response 欄位格式參考關於 /sign 說明的文章。func 為 MakeSignature,代表執行簽章。
const tbsData = { func: "MakeSignature", signatureType: document.getElementById("signatureType").value, tbs: document.getElementById("tbs").value, tbsEncoding: document.getElementById("tbs").value, pin: document.getElementById("pin").value, hashAlgorithm: document.getElementById("hashAlgorithm").value, nonce: document.getElementById("nonce").value, withCardSN: document.getElementById("withCardSN").value};popupForm.postMessage(JSON.stringify(tbsData), "*");結語
只要了解 /sign 的 Request、Response 欄位,就能夠在前端簡單的進行數位簽章。
▶ 閱讀更多:深入淺出自然人憑證